Most popular way of interacting data within the JET application is by using REST API. What if I want to store data locally/offline within my JET app? Will there be anyway? Off course Yes!
In this blog, I will explain to you how we can store data offline within our Oracle JET application. To store data offline we can use Cordova SQLite which is well supported in Oracle JET. Before creating actual JET application and integrating with Cordova SQLite, let us try to understand Cordova SQLite plugin.
Note: I have created sample application for android platform.
Note: I have created sample application for android platform.
The Cordova SQLite Plugin:
The Cordova SQLite plugin lets the app access the underlying native SQLite database by providing an API.
SQLite is an embedded DBMS based on the SQL language. SQLite database with full API is provided by iOS, Android, and Windows Phone.
The SQLite Cordova plugin provides a simple API to create databases and run queries on SQLite. This plugin exposes an API.
Here is how to create a database and run SQL queries on the SQLite database
// Wait for plugin to load
      document.addEventListener("deviceready", onDeviceReady, false);

     // Cordova is ready
    function onDeviceReady()
    {
      var db = window.sqlitePlugin.openDatabase({name: "emp.db"});

        db.transaction(function(tx) {

        //create table
        tx.executeSql("CREATE TABLE IF NOT EXISTS EMP (firstName text primary key, lastName text)", [], function(tx, res){

            //insert data
            tx.executeSql("INSERT INTO EMP (firstName, lastName) VALUES (?,?)", [fName,lName], function (tx, res){

                //retrieve data
                tx.executeSql("SELECT distinct firstName,lastName FROM EMP", [], function (tx, res){
                    for(var iii = 0; iii < res.rows.length; iii++)
                    {
                        alert(res.rows.item(iii).firstName);
                        alert(res.rows.item(iii).lastName);

                    }
                })

            });

        });

    }, function(err){

        //errors for all transactions are reported here
        alert("Error: " + err.message)

    });
}
If any of the queries fail, then the second callback passed to the transaction method is invoked. The callback of the executeSql will not be fired if the query fails.
To delete a database, we can write the code as shown below.
//delete database
window.sqlitePlugin.deleteDatabase({name: "emp.db"}, function(){
alert("Successfully deleted database");
}, function(){
alert("Error while delete database");
});
This is basics of integrating SQLite within an application. If you wanted to know more about Cordova and SQLite then refer below links
Now Let’s see how we can create JET hybrid app and leverage the Cordova SQLite plugin to achieve offline storage within our JET application. In this tutorial, We will create Hybrid Oracle JET application for android platform.
The Oracle JavaScript Extension Toolkit (JET) framework includes support for hybrid mobile application development, providing Android and iOS Alta themes and UI behavior on Oracle JET components, starter applications, design patterns, and tooling support.
Before you can create your first hybrid mobile application, you should become familiar with the Oracle JET mobile features and third-party technologies. You must also install the prerequisite packages and Oracle JET mobile tools.
For installation and setting up the environment, please refer “Getting Started with Oracle JET Hybrid Mobile Application Development” section in the Oracle JET Developer guide.
Along with above mentioned Tooling packages, we need to install Cordova in our development machine.
Node.js (npm) helps to achieve this.
Install Cordova
In order to Install Cordova on your development machine,
As Administrator on Windows or using sudo on Macintosh and Linux systems, enter the following command to install Apache Cordova:
[sudo] npm install -g cordova
To make sure, Cordova installed successfully, just try cordova –version in the command prompt

Once all the necessary tooling packages along with Cordova is installed, we need to install Cordova SQLite plugin within our Oracle JET application. We will do this step, after creating JET Hybrid application.
I believe, you have already installed 'YoOracleJET plugin' in NetBeans IDE and you know how to create Hybrid JET mobile application using NetBeans IDE.
Creating a new project

3) Give a Project Name (CordovaSQLiteJETEmpApp in this example) and provide appropriate Project Location.

4) Now, the project with be automatically created by Yeoman generator.
5) Wait till the project is created successfully and make sure the message “Done, without errors.” is displayed in the console as shown below.

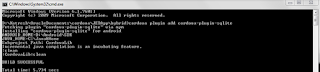
To Install SQLite plugin within your JET Hybrid app, navigate to <app root directory>\hybrid directory in your JET Application and then use below command
cordova plugin add cordova-plugin-sqlite
Below screen shot shows successful installation of Cordova SQLite plugin

Once it is successfully done, you will see below-mentioned folder structure under plugins
directory.

Also, the project structure will be updated and it looks as shown below

Now let's understand important concepts with respect to above JET app.
Initialize App
When the app loads(device ready), I am checking if the table exists or not. If the table doesn’t exist, then create it
Here is the code to initialize the app.
var db = null;
document.addEventListener("deviceready", function(){
db = window.sqlitePlugin.openDatabase({name: "emp.db"});
db.transaction(function(tx) {
tx.executeSql("CREATE TABLE IF NOT EXISTS EMP (firstName text primary key, lastName text)");
}, function(err){
alert("An error occurred while initializing the app");
});
}, false);
Here I have created a table named ‘EMP’ with two columns, firstName and lastName. With firstName as primary key.
The dashboard view model complete code is as follows
/**
* Copyright (c) 2014, 2016, Oracle and/or its affiliates.
* The Universal Permissive License (UPL), Version 1.0
*/
/*
* Your dashboard ViewModel code goes here
*/
define(['ojs/ojcore', 'knockout', 'jquery', 'appController', 'ojs/ojinputtext', 'ojs/ojtable', 'ojs/ojarraytabledatasource'],
function (oj, ko, $, app) {
function DashboardViewModel() {
var self = this;
var deptArray = [];
self.datasource = ko.observableArray();
var db = null;
// On device ready, create the table if it does not exists.
document.addEventListener("deviceready", function () {
db = window.sqlitePlugin.openDatabase({name: "emp.db"});
db.transaction(function (tx) {
tx.executeSql("CREATE TABLE IF NOT EXISTS EMP (firstName text primary key, lastName text)");
}, function (err) {
alert("An error occured while initializing the app");
});
}, false);
this.firstName = ko.observable(" ");
this.lastName = ko.observable("");
// function to fetch data from EMP Table and push it to view
self.getEmployeeData = function () {
db.transaction(function (tx) {
tx.executeSql("SELECT distinct firstName,lastName FROM EMP", [], function (tx, res) {
deptArray = [];
for (var i = 0; i < res.rows.length; i++)
{
var row = res.rows.item(i);
deptArray.push(
{
firstName: row['firstName'],
lastName: row['lastName']
}
);
}
self.datasource(new oj.ArrayTableDataSource(deptArray, {idAttribute: 'firstName'}));
});
}, function (err) {
alert("An error occured while displaying saved records");
});
};
// insert/add function and this is called on click of add button click on the page.
self.add = function () {
var fName = this.firstName();
var lName = this.lastName();
alert('First Name:' + fName);
alert('Last Name:' + lName);
if (fName === "")
{
alert("Please enter first Name");
return;
}
if (lName === "")
{
alert("Please enter last Name");
return;
}
db.transaction(function (tx) {
tx.executeSql("INSERT INTO EMP (firstName, lastName) VALUES (?,?)", [fName, lName], function (tx, res) {
alert("Record Added Successfully!..");
});
}, function (err) {
alert("Ooops!..An error occured during add operation!");
});
// Refresh employee data
self.getEmployeeData();
};
// computes full name based on firstName and lastName and returns to view
this.fullName = ko.computed(function () {
return this.firstName() + " " + this.lastName();
}, this);
// Header Config
self.headerConfig = {'viewName': 'header', 'viewModelFactory': app.getHeaderModel()};
self.handleActivated = function (info) {
// Implement if needed
};
self.handleAttached = function (info) {
// Implement if needed
};
self.handleBindingsApplied = function (info) {
// Implement if needed
};
self.handleDetached = function (info) {
// Implement if needed
};
}
return new DashboardViewModel();
}
);
In the above View Model code,
On device ready, creating a table named EMP, if it does not exist.
add function is responsible for inserting user entered firstName and lastName values into EMP table.
getEmployeeData() function is responsible for fetching data from EMP table and passing it back to view. Used ko observable array to push data to a table in view section.
In the dashboard.html, I have put below-mentioned HTML code
<div>
<div class="oj-applayout-fixed-top">
<header role="banner" class="oj-hybrid-applayout-header" data-bind="ojModule: headerConfig">
</header>
</div>
<div class="oj-applayout-content">
<div role="main" class="oj-hybrid-applayout-content">
<div class="oj-hybrid-padding">
<h3>Dashboard Content Area</h3>
<p>First Name: <input data-bind="value: firstName" /></p>
<p>Last Name: <input data-bind="value: lastName" /></p>
<button id="buttonOpener" data-bind="click: add, ojComponent: {component: 'ojButton', label: 'Add'}"></button>
<p>Full name: <strong data-bind="text: fullName"></strong></p>
<div id="tableId">
<table id="table" summary="Department List" aria-label="Departments Table" class="dept-table"
data-bind="ojComponent: {component: 'ojTable',
data: datasource,
selectionMode: {row: 'single'},
columnsDefault: {sortable: 'none'},
columns: [{headerText: 'First Name',
headerStyle:'background-color:red', style:'width:30px;',
field: 'firstName'},
{headerText: 'Last Name',
headerStyle:'background-color:red', style:'width:30px;',
field: 'lastName'},
],
rootAttributes: {'style':'width: 100%; height:100%;'}}">
</table>
</div>
</div>
</div>
</div>
</div>
As you see , the above code is self-explanatory. I have 2 input text fields which are bind to firstName and lastName.
Created ojTable to show entered firstName and lastName information on click of add button and table fetches data from the data source.
Build the application for android and Test the application.
Now, our application is ready. Next step is to build the project using grunt for android platform. To do so,We can configure grunt build commands in our project properties as shown below
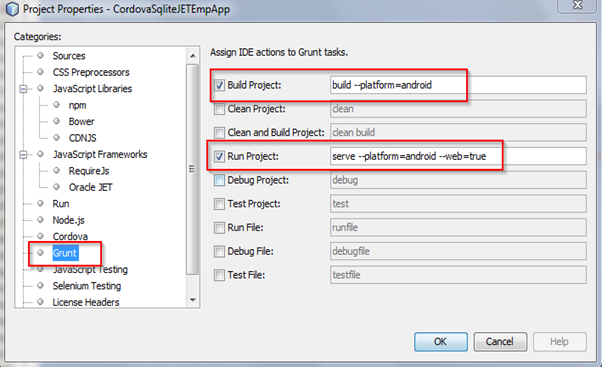
As you see in the above screenshot, I have configured for android platform.
After a successful build, apk file is generated. You can find the apk file by navigating
<application root directory>\ hybrid\platforms\android\build\outputs\apk as shown in below screen shot

Copy the apk file to your android device and install the app.
Once the app started, home page looks as shown below

Provide value for First Name, Last Name and click on ‘Add’ button.
Record will get inserted into table and shows success message as shown below.

Table will show the entered record as shown below

Added couple of records, table refreshed and shows recently added records.

References
1. Getting Started with Oracle JET Hybrid Mobile Application Development
2. Storing local data in a Cordova App